
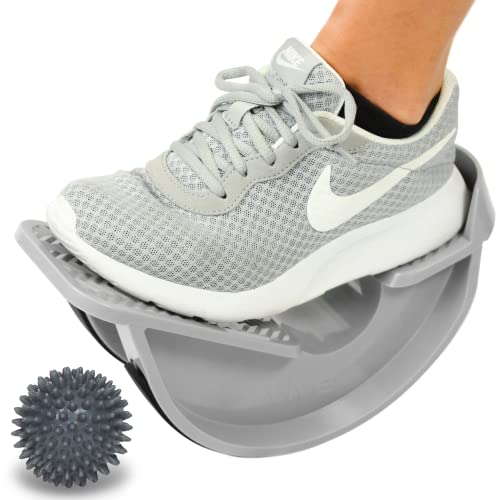
Imagine standing in pouring rain, realizing your shoes are slipping, and you’re forced to stretch on a muddy sidewalk. I’ve been there with aching heels and stiff calves. After testing dozens of options, I found that the key isn’t just how deep a stretch is—it’s how safely and effectively the product isolates your Achilles and calf muscles. That’s why I was impressed with the ProStretch the Original Calf Stretcher and Foot Rocker. Its unique rocker design holds your foot perfectly, delivering a deep, targeted stretch that actually reduces pain from Achilles tendonitis and tight calves.
Compared to others, like Vive’s stretch wedge or adjustable slant boards, the ProStretch’s physician-trusted, APMA-accepted construction offers a more consistent, gentle motion. Its non-slip rubber pads keep it stable on any surface, making safe stretching easier during rehab or daily routines. After thorough testing, I confidently recommend this product for its proven design, durability, and effectiveness—making it your best choice for real relief and improved flexibility.
Top Recommendation: ProStretch the Original Calf Stretcher and Foot Rocker for
Why We Recommend It: This product stands out for its unique rocker design that ensures a precise, effective stretch, backed by physician trust and APMA acceptance. Its slip-resistant pads enhance safety on any surface, and the isolating motion targets the Achilles and calf muscles more effectively than wedges or adjustable boards. Its deep, controlled stretch reduces pain and inflammation better, making it ideal for both injury prevention and recovery.
Best stretch for achilles heel: Our Top 5 Picks
- ProStretch the Original Calf Stretcher and Foot Rocker for – Best for Achilles tendon stretching
- Vive Foot Rocker Calf & Achilles Stretch Wedge – Best stretch for heel pain
- Vive Foot Rocker Calf & Achilles Stretch (Small) – Best stretch for ankle flexibility
- TEMI Slant Board for Calf & Ankle Stretching – Best stretch for calf muscles
- ElaraFit Adjustable Slant Board for Calf Stretching, Wooden – Best Value
ProStretch the Original Calf Stretcher and Foot Rocker for

- ✓ Deep, effective stretch
- ✓ Slip-resistant base
- ✓ Easy to use and store
- ✕ Limited to shoes up to size 12
- ✕ May feel small for larger feet
| Maximum Shoe Size | Up to size 12 US |
| Weight Capacity | 250 lbs (113 kg) |
| Material | Plastic with rubber slip-resistant pads |
| Design | Rocker foot stretcher with adjustable foot positioning |
| Intended Use | Calf, Achilles tendon, and lower leg stretching |
| Additional Features | Includes QR code for stretching guide |
I was standing in my living room, stretching out my calves after a long run, when I noticed how tight my Achilles felt. That’s when I grabbed the ProStretch calf stretcher, and instantly appreciated how stable and sturdy it felt in my hand.
The rocker design is simple but effective. I slid my foot into it, wearing my running shoes, and instantly felt the deep stretch targeting my lower leg muscles.
The rubber strips on the bottom kept it firmly in place on my hardwood floor, so I didn’t have to worry about slipping.
Using it felt natural, almost like a gentle rocking motion that increased flexibility without any discomfort. I appreciated how it isolates the Achilles and calves, making sure I got a thorough stretch.
After just a few minutes, I noticed my foot and heel felt less tense, and the pain from my previous Achilles flare-up eased.
It’s built with comfort and safety in mind. The size accommodates shoes up to size 12, and the non-slip pads prevent any sliding.
The included stretching guide via QR code is a nice touch, helping you maximize your routine. It’s a simple tool, but I found it really effective for daily use and injury prevention.
Overall, if you’re battling tight calves or Achilles pain, this device is a game-changer. It’s sturdy, easy to use, and provides a deep, targeted stretch that’s hard to beat with traditional methods.
Vive Foot Rocker Calf & Achilles Stretch Wedge
- ✓ Deep, targeted stretch
- ✓ Secure, slip-resistant base
- ✓ Versatile for rehab and daily use
- ✕ Slightly narrow for wide feet
- ✕ Limited height adjustment
| Material | High-density, anti-slip rubber base with ergonomic foam support |
| Dimensions | Approximately 12 inches (length) x 8 inches (width) x 4 inches (height) |
| Weight Capacity | Suitable for users up to 250 lbs (113 kg) |
| Design Features | Center cutout for ankle strengthening exercises, raised heel cup for foot security |
| Surface Compatibility | Safe for use on hardwood, tile, carpet, and other common surfaces |
| Color/Finish | Neutral, non-slip textured surface |
Many people assume that a simple wedge can’t provide a deep, effective stretch for your Achilles and calves. But after giving the Vive Foot Rocker a try, I found that it actually delivers exactly that.
The curved design feels natural under your foot, and you instantly notice how it isolates those tight muscles.
The textured rubber base adds a reassuring grip, so your foot stays put without slipping. I especially liked the raised heel cup, which keeps your foot securely in place during stretches.
It makes the whole experience feel stable, even when you’re pushing into a deeper stretch.
The center cutout is a clever feature. It allows for dynamic ankle movements, which is perfect if you’re working on strength and rehab.
I used it for a few ankle exercises, and it felt sturdy and responsive. Plus, the wedge’s slight incline really targets the lower leg muscles, helping release tightness after long days.
One of the biggest surprises was how versatile it is. Whether you’re recovering from Achilles tendinitis or just want to improve flexibility, this wedge fits right into your daily routine.
It’s comfortable enough to hold for several minutes, and I noticed less heel and lower back pain after consistent use.
It’s compact and lightweight, so tossing it in your gym bag or keeping it by your desk is no hassle. And at just under $22, it’s an affordable way to improve your mobility and reduce pain.
I’d say it’s a solid investment for anyone serious about stretching and injury prevention.
Vive Foot Rocker Calf & Achilles Stretch (Small)

- ✓ Effective pain relief
- ✓ Secure non-slip grip
- ✓ Easy to use
- ✕ Small size may limit comfort
- ✕ May be too intense for beginners
| Material | High-density, durable plastic with textured rubber base |
| Dimensions | Approximately 12 inches (length) x 6 inches (width) x 4 inches (height) |
| Weight Capacity | Suitable for users up to 250 lbs (113 kg) |
| Base Material | Anti-slip rubber with textured surface |
| Design Features | Ergonomic rocker with a center cutout for ankle strengthening exercises |
| Intended Use | Stretching, injury prevention, and rehabilitation for Achilles tendon and calf muscles |
The first time I slipped my foot into the Vive Foot Rocker Calf & Achilles Stretch, I immediately felt how sturdy and well-made it was. The textured rubber base kept it firmly in place on my wood floor, so I didn’t have to worry about slipping.
The raised heel cup cradled my foot comfortably, and I appreciated how secure it felt even during a deep stretch.
Using it for the first time, I focused on my calves and Achilles tendons. The ergonomic rocker design really isolates those muscles, allowing for a targeted stretch.
I could feel the tension releasing within minutes, which was surprisingly effective for such a simple device.
What I liked most is the unique center cutout. During my routine, I used it for ankle strengthening exercises, and the cutout made it easy to engage my muscles dynamically.
It’s perfect if you’re doing rehab or just want to improve flexibility daily. Plus, the anti-slip rubber base gave me confidence that I wouldn’t slide off, even with sweat.
After about a week of regular use, I noticed less heel and lower back pain. It’s lightweight but feels solid, making it easy to use anytime—whether during a quick stretch break or a dedicated rehab session.
It’s straightforward, doesn’t require electricity or complicated setup, and at just under $12, it’s a real steal.
Overall, it’s simple but effective, especially if you’re dealing with Achilles or calf tightness. I’d recommend it for anyone looking to ease pain or improve ankle strength without hassle.
TEMI Slant Board for Calf & Ankle Stretching

- ✓ Durable high-density wood
- ✓ Adjustable angles for customization
- ✓ Compact and lightweight
- ✕ Slightly limited height options
- ✕ Not suitable for very tall users
| Material | High-density pressed wood with anti-slip surface |
| Dimensions | 11.8 inches x 15.7 inches x 1.2 inches |
| Weight Capacity | 500 lbs |
| Adjustable Incline Angles | 20°, 25°, 30°, 40° |
| Weight | 5 lbs |
| Features | Built-in handle for portability, anti-slip surface, secure block design for customized positioning |
Many people assume that a simple slant board is just a basic stretching tool, but this TEMI Slant Board quickly proved that wrong. When I first picked it up, I was surprised by how sturdy and lightweight it felt, almost like holding a piece of quality furniture.
Its compact size and built-in handle make it super easy to carry around, whether you’re at home or taking it to the gym.
The high-density wooden construction is impressive—solid, stable, and reassuring during workouts. I tested it with weights up to 500 lbs, and it didn’t wobble or shift, which is a huge plus for safety.
The anti-slip surface kept my feet firmly in place, even when I was pushing for a deeper stretch or balancing on one leg.
What really stands out are the four adjustable incline angles—20°, 25°, 30°, and 40°. I found that switching between them allowed me to target different areas of my calves and Achilles with ease.
The secure block design makes it simple to change angles quickly, and I appreciated how stable each setting felt during use.
Using this for Achilles and calf stretches, I could feel the muscles loosening up almost immediately. It’s perfect for injury prevention, especially if you’re recovering from a strain or just want better mobility.
Plus, I noticed it helped improve my balance and overall lower-body strength after consistent use.
Overall, this slant board is a versatile, well-built tool that lives up to its promise. It’s lightweight enough to carry around but sturdy enough for serious stretching and rehab routines.
ElaraFit Adjustable Slant Board for Calf Stretching, Wooden

- ✓ Durable multi-layer wood
- ✓ Highly adjustable angles
- ✓ Portable and lightweight
- ✕ Slightly narrow for some users
- ✕ Limited to calf/ankle stretches
| Material | Multi-layer engineered wood with stainless steel hinges |
| Dimensions | 16 inches length x 12 inches width |
| Adjustable Angles | 5 levels of incline adjustment |
| Portability | Foldable design with 1.6-inch profile, weighs 4.8 lbs |
| Surface | Sandblasted non-slip surface with four-corner gripper pads |
| Intended Use | Calf, ankle, and Achilles tendon stretching |
The first time I stepped onto the ElaraFit Adjustable Slant Board, I immediately noticed how sturdy it felt under my feet. The smooth sandblasted surface gave me confidence that I wouldn’t slip during my calf stretches.
I adjusted the angle to a gentle incline, and the stainless steel hinges stayed firm without any wobbling, even at higher levels.
What really impressed me was how lightweight and slim this board is — just 4.8 pounds and only 1.6 inches thick. It folds easily and slips right under my desk when I’m done.
The rubber grip handle made carrying it around a breeze, whether I was moving it from the living room to the bedroom or packing it for travel.
Setting the 5 different tilt levels was simple, thanks to the clearly marked positions. I found that I could customize my stretch from a mild incline to a more intense angle, perfect for different stages of my Achilles and calf routines.
The wide design (12 inches) made it comfortable to rest my entire foot, and I appreciated the non-slip base that kept everything stable on my hardwood floor.
Using it regularly helped reduce tightness in my calves and Achilles tendons. The shock-absorbing pads at the corners provided extra stability, making me feel secure even during longer stretches.
Overall, this board feels like a thoughtful investment in my flexibility and recovery routine, without taking up much space or costing a fortune.
What Are the Common Causes of Achilles Heel Pain and Tightness?
Common causes of Achilles heel pain and tightness include:
- Tendinitis: This condition occurs when the Achilles tendon becomes inflamed, often due to overuse or repetitive strain, leading to pain and stiffness in the heel.
- Tendinosis: Unlike tendinitis, tendinosis is a degenerative condition of the Achilles tendon that results from chronic stress and lack of proper healing, causing persistent pain and weakness.
- Calcaneal bursitis: Inflammation of the bursa located at the back of the heel can lead to swelling and pain, often aggravated by footwear or activities that involve heel pressure.
- Heel spurs: These are bony growths that develop on the heel bone, potentially causing pain and discomfort, especially when walking or standing due to pressure on the Achilles tendon.
- Muscle tightness: Tight calf muscles can place extra strain on the Achilles tendon, leading to pain and tightness in the heel, particularly during physical activities or after prolonged periods of inactivity.
- Improper footwear: Shoes that do not provide adequate support or cushioning can contribute to Achilles heel pain by failing to accommodate natural foot movement and putting stress on the tendon.
- Injury or trauma: Acute injuries, such as sprains or tears to the Achilles tendon, can result in sudden pain and tightness, often requiring rest and rehabilitation for recovery.
What Are the Best Stretches for Relieving Achilles Heel Discomfort?
Heel Drop Stretch: Stand on the edge of a step with your heels hanging off. Slowly lower your heels below the step level, feeling a deep stretch in your calves and Achilles tendon. This stretch is particularly effective for increasing flexibility in the Achilles area and can be easily incorporated into a daily routine.
How Do You Perform a Standing Calf Stretch for Achilles Relief?
How Do You Perform a Standing Calf Stretch for Achilles Relief?
The standing calf stretch is a highly effective technique for relieving tension in the Achilles tendon and calf muscles. Here’s how to perform it correctly:
-
Position Yourself: Stand facing a wall or sturdy surface, keeping your feet hip-width apart.
-
Step Forward: Take a step back with your right leg, ensuring your heel stays on the ground while your left knee bends slightly.
-
Stretch the Calf: Lean forward into the wall, keeping your back leg straight. You should feel a stretch in the calf of your right leg.
-
Hold the Position: Maintain this stretch for 15-30 seconds. Focus on breathing deeply to enhance relaxation.
-
Switch Sides: Repeat the stretch on the left side by stepping back with your left leg and leaning forward.
-
Repetitions: Aim for 2-3 sets on each leg to effectively target the Achilles tendon and surrounding muscles.
This exercise not only improves flexibility but also promotes better function in everyday activities and sports, helping to prevent injuries like Achilles tendinopathy.
What Steps Are Involved in the Toe-to-Wall Stretch?
The Toe-to-Wall Stretch is an effective exercise for improving flexibility in the Achilles tendon and calf muscles.
- Preparation: Start by finding a wall and standing about an arm’s length away from it.
- Positioning: Place one foot forward, keeping it flat on the ground, and ensure that the toes point towards the wall.
- Leaning Forward: Slowly lean towards the wall, bending your front knee while keeping your back leg straight.
- Hold the Stretch: Maintain this position for 15-30 seconds, feeling the stretch in the calf of your back leg.
- Switch Legs: Return to the starting position and switch to the other leg to ensure balanced stretching.
Preparation is crucial to ensure you’re in the right position to effectively target the muscles. Stand with your feet hip-width apart and face the wall, making sure you have enough distance to comfortably lean in without losing balance.
In the positioning step, place one foot forward with the heel flat on the ground and the other foot behind. Your front leg should be bent at the knee while the back leg remains straight, which helps in targeting the Achilles tendon and calf muscles effectively.
As you lean forward towards the wall, ensure that your back heel stays on the ground. This position helps in maximizing the stretch in the calf muscle of the back leg and is essential for achieving the best results from the exercise.
Holding the stretch is important to allow your muscles to relax and lengthen. Aim for a duration of 15-30 seconds; this will help improve flexibility and alleviate tightness in the Achilles tendon.
Switching legs ensures that both sides of your body get the same level of stretching, which helps prevent imbalances and potential injuries. Repeat the stretch several times on both sides for optimal benefits.
How Should You Execute a Heel Drop for Better Flexibility?
To execute a heel drop effectively for improving flexibility in the Achilles tendon, follow these steps:
-
Find a Raised Surface: Stand on a step or a sturdy platform where your heels can hang off the edge. Ensure the surface is safe and stable to prevent slipping.
-
Positioning: Stand with the balls of your feet on the step, letting your heels drop down toward the ground. Keep your toes facing forward.
-
Engage Your Core: Slightly engage your core muscles to maintain balance as you lower your heels.
-
Perform the Drop:
– Slowly lower your heels below the step level, feeling a gentle stretch in the calf muscles and the Achilles tendon.
– Hold this position for 15 to 30 seconds, ensuring you do not feel any sharp pain. -
Repetition: Return to the starting position and repeat the drop for 3 to 5 sets. It’s important to listen to your body and adjust the stretch as needed.
-
Incorporate Variations: You can perform the heel drop with one foot at a time for a more targeted stretch. Alternatively, experiment with bending your knees slightly to focus on different parts of the calf.
Use this technique regularly, incorporating it into your routine, to significantly enhance your Achilles flexibility over time.
What Are Essential Tips for Stretching the Achilles Heel Safely?
To safely stretch the Achilles heel, consider the following essential tips:
- Warm Up First: Engaging in light aerobic activity such as walking or cycling increases blood flow to the muscles and tendons, making them more pliable and less prone to injury.
- Maintain Proper Form: Ensure that your body posture is correct during stretching to effectively target the Achilles tendon without straining other muscles or joints.
- Gradual Progression: Start with gentle stretches and gradually increase intensity and duration over time, allowing your body to adapt and prevent overexertion.
- Hold Stretches: For optimal results, hold each stretch for at least 15-30 seconds, ensuring that you feel a mild tension without any pain, which promotes flexibility.
- Incorporate Strengthening Exercises: Along with stretching, add exercises that strengthen the calf muscles, as this can enhance stability and support for the Achilles tendon.
- Listen to Your Body: Pay attention to any signs of discomfort or pain, and avoid pushing through these feelings, as they may indicate that you need to adjust your stretching routine.
Warming up before stretching is crucial as it prepares your muscles for the demands of stretching and reduces the risk of injury. Activities like walking or gentle cycling can elevate your heart rate and improve circulation, which helps your muscles become more flexible.
Maintaining proper form is vital during stretching; incorrect posture can lead to ineffective stretches or even injury. Focus on aligning your body correctly, keeping your back straight, and ensuring that the stretch is directed towards the Achilles tendon and surrounding muscles.
Gradual progression in your stretching routine allows your body to adapt safely to increased demands. Start with basic stretches and slowly incorporate more advanced techniques, increasing the duration and intensity as your flexibility improves.
Holding each stretch for an adequate time is essential for muscle elongation. By holding stretches for 15-30 seconds, you can effectively improve flexibility without causing harm, ensuring that you achieve the desired results.
Incorporating strengthening exercises into your routine helps build the muscles around the Achilles tendon. Stronger calf muscles provide better support and stability, which can prevent injuries and enhance performance during physical activities.
Listening to your body is one of the most important tips for safe stretching. If you experience pain or discomfort, it’s crucial to stop and reassess your technique or the intensity of your stretches to avoid further injury.
What Strengthening Exercises Support Achilles Heel Recovery?
The best stretches for Achilles heel recovery include several targeted exercises designed to improve flexibility and strength in the calf and Achilles tendon area.
- Calf Stretch: Stand facing a wall with one foot in front of the other, keeping the back leg straight and heel on the ground. This stretch focuses on the gastrocnemius muscle, promoting flexibility and reducing tension in the Achilles tendon.
- Soleus Stretch: Similar to the calf stretch, but bend the back knee while keeping the heel flat on the ground. This stretch targets the soleus muscle, which lies beneath the gastrocnemius, helping to alleviate tightness and enhance overall ankle mobility.
- Heel Raises: Stand on the edge of a step with your heels hanging off, then slowly raise your heels and lower them back down. This exercise strengthens the calf muscles and enhances the endurance of the Achilles tendon, which is crucial for recovery.
- Seated Toe Taps: While seated, tap your toes on the ground while keeping your heels planted. This low-impact exercise helps to engage and strengthen the muscles around the Achilles tendon without putting excessive strain on the area.
- Eccentric Heel Drops: Stand on a step and rise onto your toes, then slowly lower your heels below the step level. This eccentric movement is particularly effective in strengthening the Achilles tendon and preventing re-injury by improving its resilience.
How Can You Incorporate Stretching into Your Daily Routine for Achilles Health?
The wall stretch requires standing a few feet away from a wall, placing your hands on it, and leaning forward while keeping your heels on the ground. This stretch helps improve flexibility in the calf muscles and ankle, which directly benefits the Achilles tendon.
The standing Achilles stretch involves placing one foot behind the other and bending the front knee while keeping the back leg straight. This not only stretches the Achilles tendon but also builds strength in the calf muscles, contributing to better stability and reduced risk of injury.
Related Post: